Mapmaker Overview
Last updated: January 26, 2026
The Mapmaker is Gather's advanced customization tool where you can fully edit the objects and layout of your space. This article will give you an overview of how it works with additional links to learn more.
In order to use the Mapmaker, you must have a user role of Admin or Mapmaker. Only one person should make changes with the Mapmaker at a time. If multiple people are using it and someone hits Save, changes can be overwritten.
Overview
To open the Mapmaker:
- Click the Customize button (hammer icon) in the bottom navigation bar
- At the top of the panel, click Open Mapmaker
- The Mapmaker will open in a new browser window
Your space is made up of Rooms (or floors). You'll find them listed in the lower right.
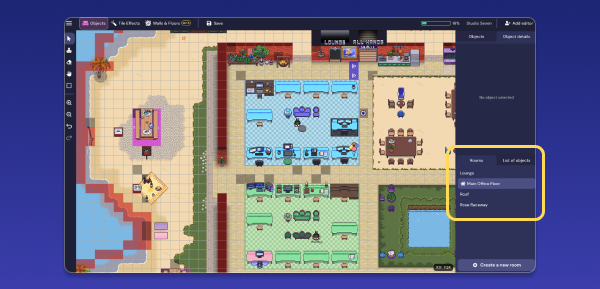
There are three main components that determine what a Room looks like and how you move around it:
- The Background: The image everything sits on top of
- Objects: Individual items
- Tile Effects: How you add behavior to tiles on the grid
Objects
The objects are the individual items like tables and chairs. They can be interactive (like documents that include a link to a file) or decorative (like a plant).
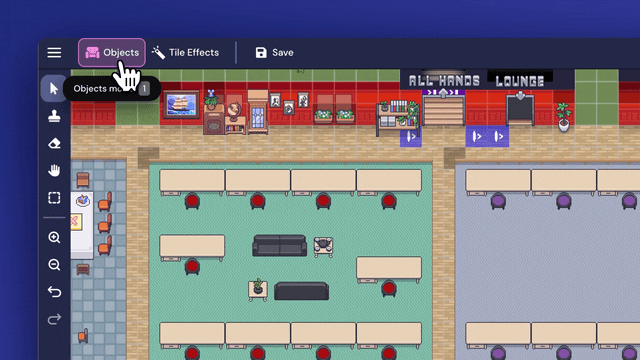
To add a new object:
- At the top of the Mapmaker, click the Objects tab
- In the panel on the right, click More Objects to view the full catalogue
- Select an object and use the options on the right to customize the color, orientation, and interactions
- Click Select and then click on the map to place the object.
As you move the object around with your mouse, it will automatically snap to the grid. If you want to override this to place it in between grid lines, hold the control or command key while placing the object.
To move or change an object:
- At the top of the Mapmaker, click the Objects tab
- On the left sidebar, click the Select tool (arrow icon)
- Click on the object you want to edit
- Use the Object Details panel on the right to change the color, orientation, or interactions
- Click and drag the object on the map to move its position
To remove an object:
- At the top of the Mapmaker, click the Objects tab
- On the left sidebar, click the Eraser tool (eraser icon)
- Click on the object you want to delete
Pro-tip: If you accidentally remove the wrong object, click Undo on the left side panel or use the keyboard shortcut Ctrl + Z or Cmd + Z.
Tile Effects
Tile effects add behavior to the tiles beneath objects. For example, Impassable Tiles block you from walking on that tile (so they’re common under desks or walls) or Private Area Tiles create private meeting areas.
Tiles can have more than one type of effect on them. For example, picture a table in the middle of a meeting area. It might have a Private Area tile effect since it's part of the meeting area and an Impassible tile effect so people can't walk on top of the table.
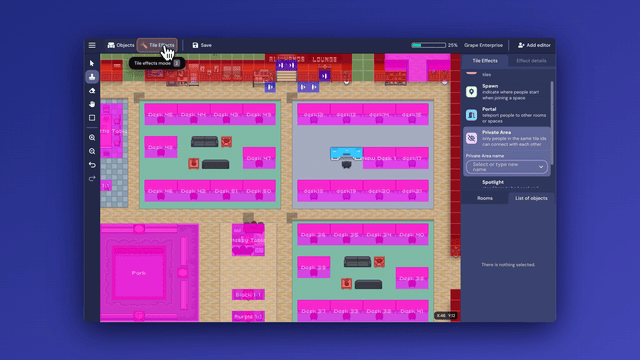
To add tile effects:
- At the top of the Mapmaker, click the Tile Effects tab
- In the panel at the the right, select the type you want to place. Depending on the effect, you may need to enter a few details.
- Click on the map to place a single tile or click and drag to fill an entire area
To remove tile effects:
- At the top of the Mapmaker, click the Tile Effects tab
- In the panel at the right, select the type of tile effect you want to remove
- Click the Eraser tool (eraser icon) in the sidebar on the left.
- Click on a tile on the map to remove a single effect or click and drag to erase an entire area
Pro-tip: If you accidentally remove the wrong tile effect, click Undo on the left side panel or use the keyboard shortcut Ctrl + Z or Cmd + Z.
Selecting a Group of Objects & Tile Effects
If you want to copy, move, or remove a group of objects and tile effects at the same time, you can use the Box Select tool (the box outline icon) on the left side panel. This is helpful when rearranging your office, such as moving a desk pod or adding a private meeting area, that way you don't have to manually place every single object and tile effect.
To copy a group of objects & tile effects:
- At the top of the Mapmaker, click the Objects tab
- On the left sidebar, click the Box Select tool (box outline icon)
- Click and drag around the group of objects you want to copy
- Click Copy Selected at the top of the right panel
- Click on the map to place the whole group
To move a group of objects & tile effects:
- At the top of the Mapmaker, click the Objects tab
- On the left sidebar, click the Box Select tool (box outline icon)
- Click and drag around the group of objects you want to move
- Click on the group and drag your mouse to move them
- Release your mouse to place the group in its new position
To remove a group of objects & tile effects:
- At the top of the Mapmaker, click the Objects tab
- On the left sidebar, click the Box Select tool (box outline icon)
- Click and drag around the group of objects you want to delete
- Click Erase Selected at the top of the right panel