Add Booths & Poster Sets
Last updated: January 26, 2026
The spatial design in Gather creates the perfect opportunity to showcase sponsors, vendors, or poster sessions. Event guests can stop by any booth to talk to a sponsor, check out a vendor's merch, or talk to a presenter about a poster.

Our conference templates include Rooms with both booth sets and poster sets. You can easily customize these sets, adding posters or logos as desired. In this article, we're using the Basic Conference template. This article covers adding a poster or a logo to an existing poster or booth set, adding a booth or poster set, and picking up tips and tricks for poster sessions.
Note: You must have the Builder user role to add and edit booths, poster sets, and/or posters! See our article on User Roles for how to add Builders to your Space.
Tip: It's generally easiest to have one Builder upload all posters or logos so that no one overwrites each other's changes. Have your presenters or vendors email their files to the Builder.
Add a Poster
For templates with a pre-designed poster set room, you can easily add the poster image to the poster set. Select Build in the toolbar, then select Edit in Mapmaker. From the Mapmaker, find the room that has poster sets. (Poster sets do not have tables and chairs in front of them.)

Select the poster set you wish to edit. In the right panel of the Mapmaker, the Object Details panel shows fields to upload the poster image and the preview image. Select Choose File, then browse your computer's file explorer to upload the poster image.
Note: The poster image should be a .png or .jpg file that's at least 1000 x 600 px and no larger than 3 MB.

Advanced Options
As with any object, you can set advanced options for the poster object. These are optional.
- Activation Distance: You do not need to change the activation distance. When a person walks into the private area of the poster set, they are prompted to press "x" to interact with the poster. However, if you'd like attendees to be able to see your poster walking by without entering the private area, set the activation distance to 1. Unless your booths are several tiles apart, you should not set the activation distance higher than 1.
- Prompt Message: You can customize the interaction message. By default, the message is "Press x to interact." You could change it to something like "Press "x" to view poster."
- Object Image and Active Image: You do not need to change the Object Image or Active image. Uploading your own files will remove the poster set.
- Caption: You can create a caption for the poster, which is available by clicking on the Info icon when the poster is full-screen.
- Display Start and End Time: If you want to only make the posters visible during a specific time frame, you can set a custom date and time for the poster image to be available.
Select Save in the Top Nav Menu of the Mapmaker. From the hamburger menu in the top left of the Mapmaker, select Go to Space to view and test the poster.

Add a Logo
For templates with a pre-designed booth set room, you can easily add a logo or banner image to the booth set. Select Build in the Left Nav Menu, then select Edit in Mapmaker. From the Mapmaker, find the room that has booth sets. (Booth sets have tables and chairs in front of them and come in two sizes.)

Open the Object Picker. In the Left Nav Menu, select Upload New. Drag and drop or browse your computer's file explorer to upload the logo or banner image. Enter an object name and click Create and select.

Note: The logo or banner image should be a .png or .jpg file that's between 32-192 px wide and no taller than 64 px, as well as under 3 MB in size. Make sure you're using a logo with a transparent background!
Place the logo or banner on the booth set. To fine tune the placement of the logo, select the Zoom In tool in the Left Nav Menu and click several times on the Map. Then, with the Select tool in the Left Nav Menu, drag your logo to the desired position.
Tip: To liven up your booth, use decorative objects like balloons or plants! You can also add the document or TV objects and embed your marketing material or sign-up forms in them!
Select Save in the Top Nav Menu of the Mapmaker. From the hamburger menu in the top left of the Mapmaker, select Go to Space to view and test the booth.

Add a Booth or Poster Set
If the template you've chosen does not already include booths, head to the Mapmaker. From the Object Picker, search for "booth set" or "poster set." Choose your preferred color, then click Select.
Tip: You can individually add objects to fine tune the appearance of your booth or poster sets. Search the Object Picker for "backdrop," "table with tablecloth," "small chair," and "shadow."

Place the booth or poster set on the map. Next, you'll need to add Private Area and Impassable tiles.
Add Private Area Tiles
Private Area tiles are important to allow presenters or vendors to easily speak with attendees. In a private areas, you only connect with the audio and video of the people in the private area with you. This means people can walk past booths or posters and choose when to step in and talk to someone.
From the Mapmaker, select Tile Effects in the Top Nav Menu. In the Tile Effects panel on the right, select Private Area. All private areas now display in bright translucent pink, with numbers visible.
Make sure the Stamp tool is selected in the Left Nav Menu. Each private area must have a unique Area ID. Our standard practice is to number our areas, but you can name them anything you like. Once you've entered an Area ID, click the tiles you wish to become private.
Note: For complete details, screenshots, and best practices, see the Private Area Tiles article.
Add Impassable Tiles
Impassable tiles are important to prevent guests from walking through the backdrop or table on booth or poster sets.
From the Mapmaker, select Tile Effects in the Top Nav Menu. In the Tile Effects panel on the right, select Impassable. All impassable tile effects now display in bright translucent red.
Make sure the Stamp tool is selected in the Left Nav Menu. Click the tiles that contain the backdrop and/or table that you wish to become impassable.
Note: For complete details, screenshots, and best practices, see the Impassable Tiles article.
Tips and Tricks for Poster Sessions
Poster File Tips
- Must be a .png or .jpg file
- Use a 16:9 aspect ratio:
- Minimum width is 1000 px (24.46 cm)
- Minimum height is 600 px (15.88 cm)
- Landscape is preferable to view the full image, but portrait can be used with scrolling.
- You can use PowerPoint, Canva, or another third-party application to design and save a 16:9 image.
- You can use the same file for the preview image, but for the best view, we recommend an image that is half the width and height of the image.
- Maximum file size is 3 MB.
- Do not use a transparent background.
Poster Hall Tips
- Plan a dress rehearsal: Plan a time ahead of the event and invite your sponsors or presenters to join. Demonstrate how the Space works and review basic troubleshooting steps.
- Number the booths: Direct people to a specific booth by adding number labels.
- Understand interactive objects: When a person walks up to a booth, they will need to press "x" on their keyboard to view the poster full screen.
-
Understand private areas: Anyone who comes into the shadowed area in front of a booth can see and hear each other's videos. Anyone outside the private area cannot see or hear the videos of the people in the private area.
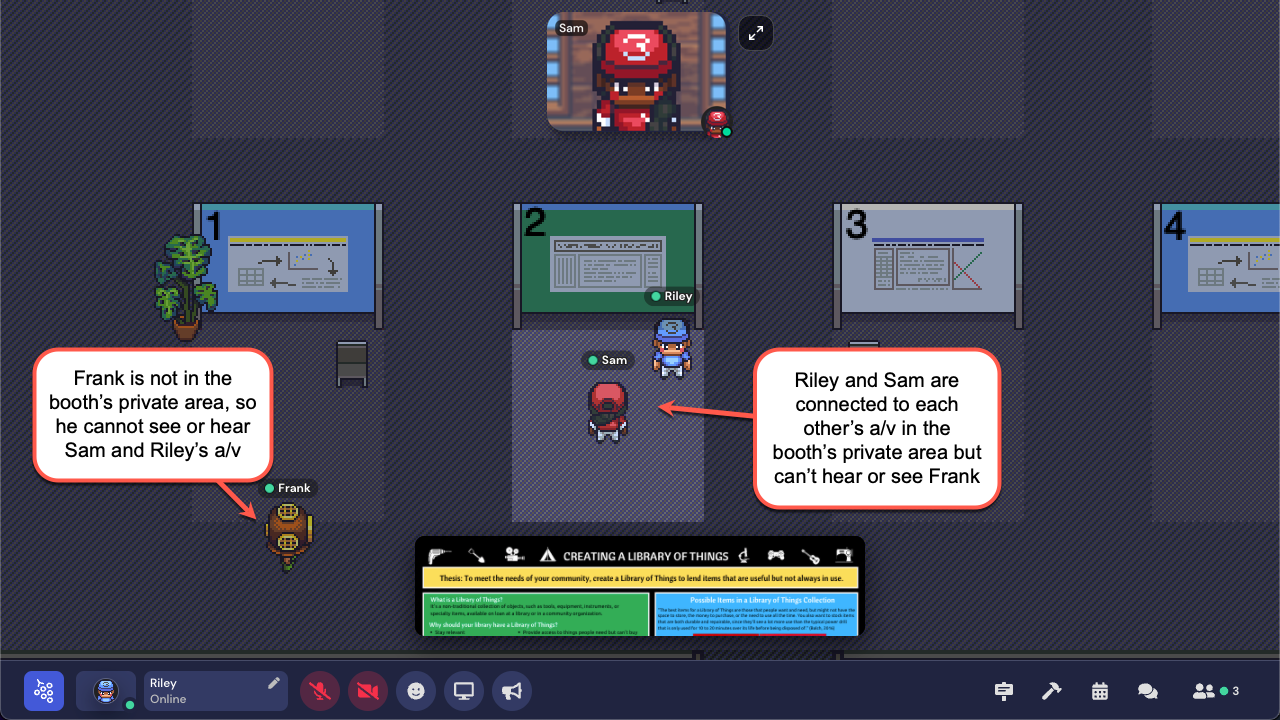 The shaded area in front of the booth or poster set is a private area. Anyone in that area can see and hear each other's audio and video (e.g., Riley and Sam), but cannot hear or see others' videos outside of that area (e.g., Heidi).
 -
Use Presenter Mode: If you have pressed "x" and are viewing the full-screen image, select the Presenter Mode icon on the right of the image. Anyone who is also viewing the image in full-screen can see where you click on the screen.
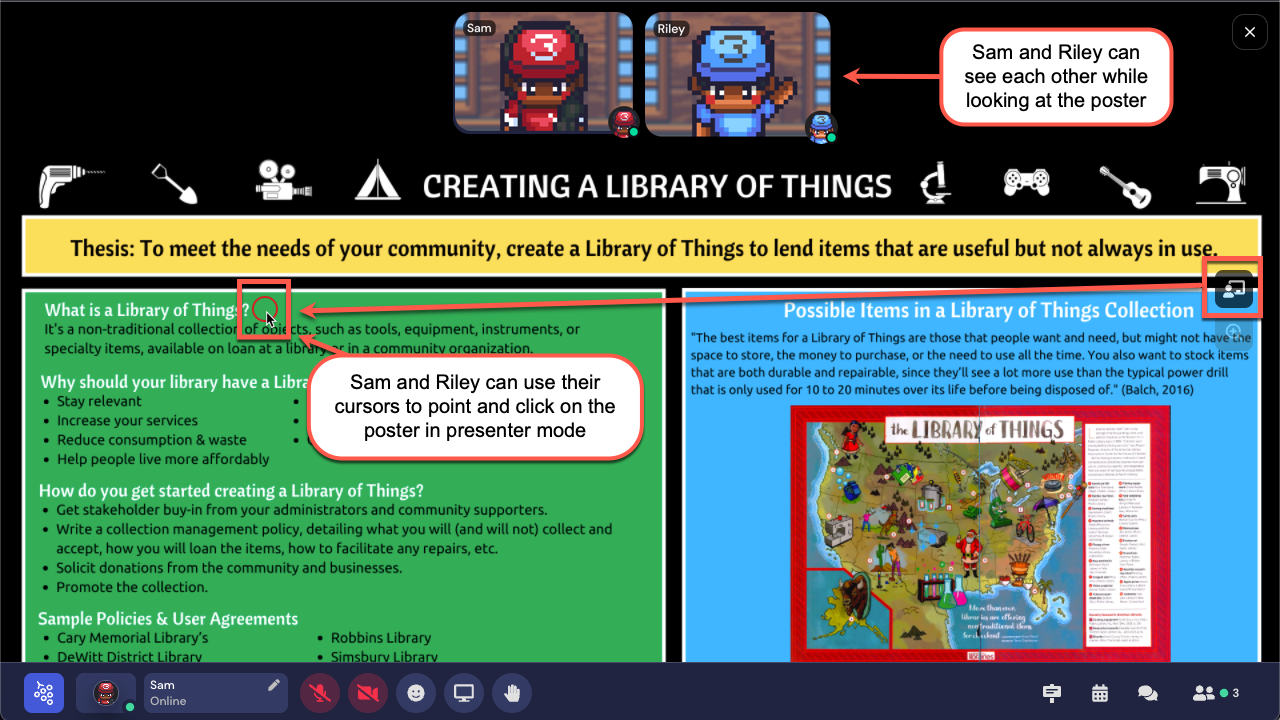 When viewing an image in full screen, select the Presenter Mode icon on the right. Any time you click on the poster, a series of circles displays on the image.
 - Zoom: If you have pressed "x" and are viewing the full-screen image, beneath the Presenter Mode icon on the right is a Zoom icon. Just select the Zoom In tool to enlarge the poster. (If you're zoomed in, you'll also see a Zoom Out tool.) You can also click and drag to move the image around when viewing it full-screen.
Logo File Tips
- Must be a .png or .jpg file
- Minimum width is approx 64 px (two tiles wide)
- Maximum height is approx 64 px (two tiles tall)
- Landscape is preferable.
- Maximum file size is 3MB.
- Use a transparent background for your logo.
Booth Hall Tips
- Review tips on having a dress rehearsal, using interactive objects, and understanding private areas from the Poster Hall Tips above.
- Plan a day where you turn on Global Build, invite your sponsors in, show them how to use the Mapmaker and add decorative and interactive objects, and have them spiffy up their booths!
- Use interactive objects like the file object or TV and embed marketing materials, like PDFs or promo videos.
Video Tutorials
We have several Mapmaker tutorials that you may find helpful when designing a poster or booth hall. The interface on these videos is a little outdated, but basic functionality remains the same. You can also search the internet for "Gather Poster Sessions" to see videos of other organization that have used Gather for poster presentations.